Assignment 3.1: Generic Social Media App
Written by Michael, with immense styling help and feedback from Kashif Nazir. Inspired by the Flutterer assignment from CS106AXDue Thu May 18 11:59pm PT
Submissions not accepted after Sat May 20 11:59pm PT.
Backstory: You're building up quite the reputation around these parts! As you start to turn your attention back to fixing Axess, you get a message from [insert vague acquaintance]. They've got a great new startup idea: they're thinking now would be a great time to spin up a new social media platform, this time with [insert underspecified and probably not very useful feature]! They decide to start simple--there will be plenty of time to add the cool new feature after they get a few million users, surely. Unfortunately, they're a little shaky with JavaScript and APIs, so they've asked you for help. They say they'll repay you in stock options just as soon as they make it big...
For this assignment, you will implement the frontend logic for a social media-style app. The app will allow users to make posts and follow other users, showing them a feed of the posts from those they follow.
Learning goals
Through this assignment, you will
- Use JavaScript classes to represent data models backed by data from a server,
- Use
fetch,async, andawaitto interact with a backend REST API, - Implement a REST API client following an API specification, and
- Interface with and extend already-written HTML, CSS, and JS code.
Overview
When you are finished, your app will look something like this:
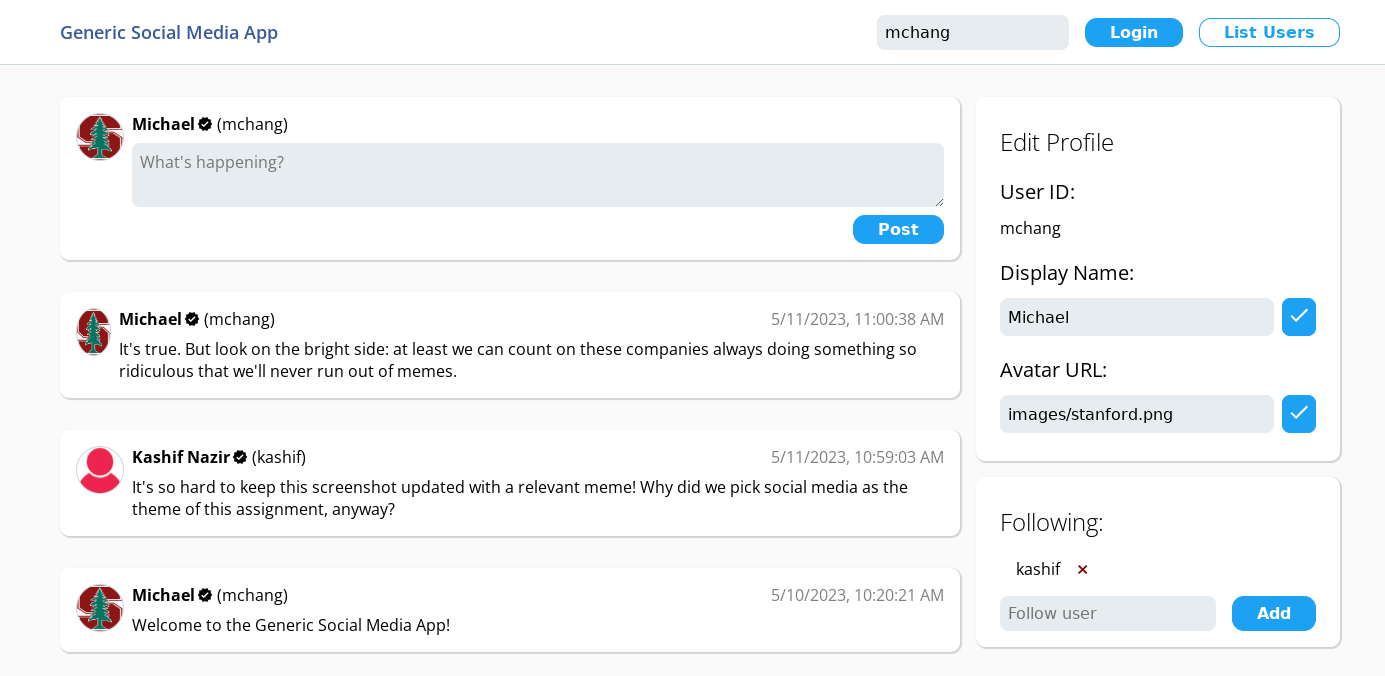
After logging into the app (there is no password or authentication), you are shown a feed of the posts made by users you follow. You can make a post, update your display name and avatar, and add/remove people you're following.
To get started, download the starter code, extract it, and run npm install as usual.
There are quite a few files in the public folder, organized into subfolders for css and js. All of the HTML and CSS are written for you (huge thanks to Kashif Nazir for the styling work!), so you should only modify the files in the js folder. However, you will need to know the structure of the HTML you are working with, and we encourage you to explore the CSS for some insights and clever tricks you may find helpful for your project and future work.
Part 1: apiRequest
First, you will implement apiRequest, a small wrapper function around fetch() that will simplify making API requests.
Setup: Accessing the API
You will be sending requests to an API running on our server. To get started, go to our API setup page, where you will be given a personalized API URL. This allows you to make edits to your own database, without conflicting with others. Write this URL into js/apirequest.js, and be sure that all requests you make to our server begin with that URL.
If you ever want to reset your database to its initial state, you can use the button on that page to do so.
Once you have filled in your personalized API URL, review the comment above the apiRequest function for its expected operation, and implement it accordingly. Here are a few more details:
- The comment in
apirequest.js, like the other comments in the provided files, is an interface comment, not an implementation comment. It describes how the function will be called rather than how it works. For example, its description of thepathparameter means that the caller will always include a leading/and that your function should prependAPI_URL. - We will not test your function on invalid arguments. This means, for example, that
methodwill always be a valid HTTP method (and all uppercase),pathwill always start with a/, andbodywon't be passed if the method isGET. - You do not have to handle the case when the API is unreachable (e.g. no Internet) or doesn't return JSON. The respective calls to
fetchor.jsonwill throw an exception, which you don't have to handle. - We have written a few test cases in
testApiinjs/index.js. You can calltestApifrom the console to run them, and review the code in this function to understand the expected results. apiRequestitself is not currently exposed to the console. You may want to do so injs/index.jsfor additional testing. (But don't do this inapirequest.js.)- In addition to the other
/testsendpoints, you can make a request to/tests/echo, which will return a JSON object which includes the method, query string (as key/value pairs), and request body the server received. - When the browser makes an HTTP request that results in a non-200 status, it will print a message like
GET [url] 404 (Not Found). This is just to let you know the response had an error status; it doesn't mean an exception was thrown or caught, or necessarily indicate a correct or incorrect handling. For example, theapiRequestcall to/tests/erroris meant to generate a 499 status. As long as you don't see another error message (e.g. "/tests/error didn't throw an error"), you should be handling it correctly.
Your new apiRequest function should significantly simplify the code you'll need to write to access the app's API. You shouldn't need to (and shouldn't) write any raw fetches anywhere else.
Part 2: User class
Next, you will implement a User class, a data model that represents a user in our social media app.
Open the API specification, which describes all of the endpoints the API supports. You will probably want to keep this page open as a reference while implementing the class.
Implement the methods in the User class, in js/user.js. The listUsers static method is already written. Since the "List Users" button in part 3 is already hooked up, once you've implemented apiRequest, you should be able to get a list of users by clicking that button. You should not modify the listUsers function. If it isn't working after you have implemented apiRequest, this is a sign that your apiRequest is not implemented as specified above. User's toString is also already written.
Each of the remaining method requires only a few lines of code, thanks in large part to your apiRequest function. Many directly correspond to specific API requests. The comments give a quick summary of the methods; here are the details:
loadOrCreate(id): This static method looks up a user. If the user doesn't exist, they are created. Returns aUserinstance for the found or created user.constructor(data): Creates a new instance, using thedatareturned by the backend for a user. The keys from the API are set as (public) instance variables, e.g.id,name, etc. You can initialize any private instance variables here as well.save(): Update the user in the backend with the current values ofnameandavatarURL.- As part of this step, implement
toJSON(). This special method tells JavaScript how to convert an object to JSON. It returns a (plain) JavaScript object (i.e. a map) with the key/value pairs you want included in the JSON. - You don't need to explicitly call
toJSONanywhere; if youJSON.stringifythe User instance, this method is automatically called for you.
- As part of this step, implement
getFeed(): Return an array ofPostinstances that should be shown to the user.makePost(text): Make a post as this user, with the texttext.addFollow(id): Have this user follow the userid.deleteFollow(id): Have this user stop follow the userid.
In order to test your User class, you may want to add code to index.js, including e.g. making User available in the console. Alternatively, you may want to consider working on User and App (part 3) in parallel, so you can hook up event listeners for each method as you go.
Notes and tips:
- We will not test your constructor with invalid
data. - The provided
Postclass's constructor takes a single post object returned by the API and wraps it. This is mainly useful in_displayPostin part 3, which counts on the author being aUserand the time being aDate. - While it is somewhat less useful for a model with few fields, it is often nice to be able to change one or more of an instance's fields and then call
saveto have any changes applied.toJSONis useful for creating a "representation" of the instance to send back to the server. (By convention / for debugging, you may want to include theidin this representation, even though the API ignores it.) - When updating a user, note that the backend will reject requests that include extra properties, such as
followingor any private instance variables. - After making any change to the user, you need to make sure your instance variables are up to date. In some cases (such as setting the name or avatar URL to the empty string), the backend will use a different value than the one you sent. Rather than duplicate the work of handling this, use the response if the backend returns the updated profile.
- In some cases, the backend won't return the updated profile (e.g. adding a follow). In these cases, you should make another API request to get the full profile. It may be useful to make a helper method (e.g.
_reload) to get the profile and update the current instance's variables. - The
methodin afetchcall should be all caps. Though using lowercase method names seems to occasionally work (e.g. for GET requests on my browser), it will fail for some methods (like PATCH). - You do not have to explicitly handle any invalid calls to
Usermethods (e.g. trying to follow a user multiple times). TheHTTPErrorwill be thrown to the caller, who can handle it if necessary.
Part 3: App class
Your final task is to incorpate the User class you've written into the app. index.html and css/index.css have been written for you, and your code must work with the HTML provided.
We have started the implementation of the App class in js/app.js. Here are the parts of the app we have written already:
- The "List Users" button is fully hooked up. Once your
apiRequestfunction is working, it should be functional, displaying a list of users in your database in analert. - The
_loadProfilehelper method has been started. It fills in the user ID in the sidebar and the parts of the new post form, as well as wiping out the current feed. - The
_displayPosthelper method is complete. It takes aPostinstance and adds it to the feed.
We have also provided a complete implementation of the FollowList class, in js/followlist.js. It is a DOM component that allows the user to add/remove users they want to follow. There is a good amount of code there; while you don't need to understand exactly how it works, it should generally use concepts you are familiar with.
Review the comments and public interface of FollowList to understand how it works. A few high-level notes:
- The constructor, in addition to taking the DOM element to add the list and form to (
parent), takes two callback functions,onAddandonRemove. FollowList will callonAddwhen the user enters an ID in the form and clicks Add, and it will callonRemovewhen the user clicks on a remove button next to a user they are following. Like the callback functions you pass toaddEventListener, you will need tobindthe methods you pass as arguments. - The class does not automatically update the list when the user tries to add or remove someone, because it doesn't know if that action will be successful. After you have make the appropriate request to the backend (in your callback functions), you will need to reload the list of followed users by calling
setList. This is best done as part of reloading the entire profile in the app, which will handle setting the initial following list as well. - The class abstracts away all of the details of how the list and form work. You should not directly access any DOM elements it creates or add your own event listeners to them. Pass in the container you want the list to appear in, and interact with the list only through
setListand the two callback functions.
Complete the app by replacing the TODOs. When you are done, the app will behave as follows:
- When the user enters their user ID into the login input and clicks "Login," their profile is loaded:
- In the sidebar, their user ID is shown, and their display name and avatar URL are filled in the
<input>s. - The "Following" panel shows a list of users they are currently following (using
FollowList). - The feed panel on the left shows the posts by the users they follow, as well as their own posts, from newest to oldest.
- In the sidebar, their user ID is shown, and their display name and avatar URL are filled in the
- The user can edit their display name and avatar URL in the sidebar and clicking save (the check mark). These changes are immediately reflected on the feed panel (i.e. they don't have to refresh or log in again).
- The user can follow and unfollow users using the follow list. If they try to follow a nonexistent user or a user they are already following (including themself), an
alertis shown with the error message from the backend. As above, these changes are immediately reflected in the feed. - The user can use the form above the feed to make a new post. This post will immediately show up on their feed.
A few notes and tips:
- The avatar URL can be a full URL to an external image, or a relative path such as
images/profile_red.png. The user can't upload any new images (but if you put a file in theimagesfolder, it will show up). - When an update requires part of the page to be changed, it is much easier to simply reload the profile than to make the change in place. This is why
_loadProfileclears the feed; you should be able to safely call it whenever you need to. As long as theUser's instnace variables are internally consistent, it should do the right thing. - It shouldn't be possible to encounter other API errors (e.g. requesting the feed for a nonexistent user), but they may occur while you are working; they should appear in the console as uncaught exceptions.
- Overall, there is a lot more provided code than code you have to write. Reading through and understanding someone else's code is often much more challenging than folks expect; however, we think it is a valuable skills to start developing early. We highly encourage you to take your time going through the provided code, as it will not only make things easier when completing the task, but it may also give you some useful insights for your own code. If you are having difficulty understanding any of the code we've given you, please don't hesitate to ask on the forum or in office hours.
Submitting
We hope this assignment gives you a sense of the kinds of awesome things you're able to build after just a few weeks of learning this stuff. Well done!
When you are finished, please submit your assign3.1 folder (without node_modules) to Paperless. Since it contains subfolders, please make sure to submit the entire folder as-is, not the individual JS files.