Assignment 2.1: Task Board (JavaScript)
Written by Michael, with huge help from Kashif NazirDue Tue May 2 11:59pm PT
Submissions not accepted after Thu May 4 11:59pm PT.
Backstory: Word of your awesome web dev skills is starting to make the rounds! As you work on your grand plans fortaking over the worldfixing Axess, you realize it's going to take a lot of work...and planning. Sure, you could use an off-the-shelf tool for this, but where's the fun in that? After all, with the countless web dev tutorials out there that use a to-do list as their example, maybe you should give it a try too.
In this assignment, you will write the (JavaScript) logic for a web app that tracks tasks and organizes projects. The organization system is based on a widely used system called >kanban and implemented in tools like GitHub project boards and Jira Software boards.
Learning goals
Through this assignment, you will
- Build interactive components using JavaScript classes,
- Programmatically create, style, and remove HTML elements through the DOM,
- Write CSS to style individual and groups of elements.
Overview
When you are finished, your app will look something like this:
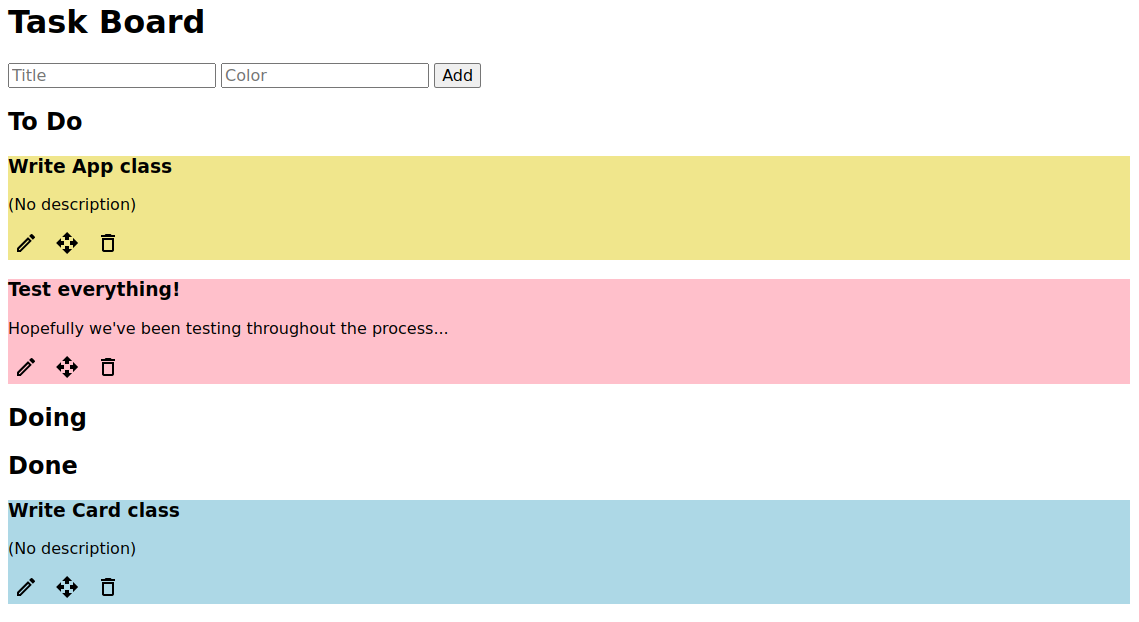
The "board" is divided into three "columns" (which are currently just headings), each containing a number of "cards." On the top is a set of controls for adding a new card. Cards have a title, a description, and a (background) color. They can be moved within and between columns and deleted, and their descriptions can be edited.
For this assignment, you won't do too much to lay out the board, columns, and cards. We will return to this in assignment 2.2, to make the app look more like a typical Kanban board. See part 4 for the specific requirements for styling in this assignment.
To get started, download the starter code, extract it, and run npm install and npm start as usual.
The assignment is divided into four parts: the first three are to implement the logic for the app, and the last is to add a handful of style rules. Each part is meant to be independently testable before moving onto the next.
Part 1: Adding cards
Review the contents of index.html, which contains the page structure for the task board. Do not modify the HTML file; your JavaScript must work with the HTML structure as given. You will implement the logic for the app in the various .js files. We have added the imports we anticipate you'll need.
The logic for this task will be split between the App and Card classes, which have the following public interfaces:
- App
constructor(): Set up the app. An App instance is created bymaininindex.js.addCard(col, title, color): Create a new card and add it to the board. This method delegates most of the work to theCardconstructor.colis a string containing theidof the column the card should be added to (i.e. "todo", "doing", or "done").titleandcolorare strings for the card's title and color. Return the newCardinstance.
- Card
constructor(title, color): Create a new card with the given title and color. A card's description should start empty (meaning it will display as "(No description)", as below). This is a good place to create the HTML elements for the card and set up handlers.addToCol(colElem, mover): Add the card to the board as the last (bottommost) card of the specified column.colElemis the DOM element for the column (i.e. the<section>element). For now, you can ignore themoverargument (passnullwhen calling this function).setDescription(text): Set the description for the card to the passed-intext, a string. If a card's description would ever be empty, the text "(No description)" is displayed instead. (We have defined the constantNO_DESCRIPTION_TEXTincard.js.)
These classes don't have any public properties/instance variables. In particular, this means a card's title or color cannot be changed after it is created. You are free to add any private instance variables and methods.
Your task is to enable adding cards to the board, as follows:
- Add cards via the
addCardmethod:- Cards should be created by duplicating the
templatecard defined at the end of the HTML. - Set the card's title and background color as passed in. You can assume title will not be empty. You do not need to validate the passed-in color; any CSS color name or specification will work when set from JavaScript (and invalid colors/empty string will be ignored by the browser).
- The card should show "(No description)" because the description starts out empty.
- The card is added to the end (bottom) of the specified column.
- Cards should be created by duplicating the
- Set a card's description via
setDescription:- Calling
setDescriptionon a card changes its description to the passed in value. - As noted above, if a card's description is ever empty, the default text "(No description)" is shown in the card instead.
- Calling
- Add cards via the form:
- When the user clicks "Add" or presses Enter in either of the text boxes, create a new card with the specified title and color (and empty description).
- If the user did not enter a title, an error message should be shown to the user. This should happen automatically because the title input is marked
required(see note if it doesn't). - Add the newly-created card to the end of the "To Do" column.
- After the card is added, clear the inputs in the add form.
Some notes and tips:
- You should not change the parameters (signature) of the methods described above. The idea is that the
Cardclass should take care of all of the logic for creating the new elements and setting their text/styles/etc..addCardcan be very simple: create a newCardand calladdToCol. - Elements with the
templateCSS class are not visible. Thus, when creating new cards, you will need to make sure those cards don't havetemplateor they will not show on the page. - You can call
querySelectoron an element (instead of ondocument) to select only descendent elements. - The
Appclass doesn't need to hold onto anyCardinstances after they are created and added, as card functionality is fully self-contained within theCardclass. - The default behavior when submitting a form is to send the form's data back to the server, causing the page to refresh. You need to stop this behavior from happening or your board will be cleared.
- Since the title input is marked as
requiredin the HTML, the browser will automatically validate it and display an error when the user tries to submit the form. However, this validation won't happen if you handle the button click instead of the form submit. - In addition to accessing elements in a form by
id, you can also access them by theirnameattribute. This can be useful if you have multiple forms with the same inputs, sinceids have to be unique across the entire page, butnames don't. - Review the reference page for useful DOM functions. See in particular the
cloneNodefunction. - We have added a few calls to
addCardand a call tosetDescriptioninindex.js. You can editmainas you'd like, so you don't have to keep adding cards every time you make a change to your code and the page refreshes. - You may expose any classes/variables to the console (via
window) or useconsole.logfor debugging, but you shouldn't leave any logging statements or global variables in your final submission.
Part 2: Editing and deleting cards
Your next task (which will have you work exclusively in Card) is to implement the edit and delete buttons, as follows:
- Delete cards: Clicking on the delete button for a card removes it from the board.
- Edit card descriptions:
- When the user clicks the edit button on a card, hide the current description and show the
<textarea>to let them enter a new description. - The text box should be filled in with the current description (which may be empty). It should be focused, with all text selected at the start.
- When the user clicks or tabs away from the text box, set the card's description to what the user entered, and return the card to its normal state (text box hidden, description shown).
- When the user clicks the edit button on a card, hide the current description and show the
Notes for this task:
- We have defined the
hiddenCSS class to not show elements (seestyles.css). The textarea starts out hidden, and you can add/remove it to the description and textarea to hide/show them. - You'll find the following methods/events on inputs (and textareas) useful for this part:
focus(),select(),blurevent. - The browser's default size for a textarea is quite small. You will add a couple styles to it in part 4, but you don't have to solve this for now. (You can drag the corner to resize the box temporarily if you want.)
- Due to the way the browser handles spaces and newlines in HTML, multiple spaces and/or line breaks will not be displayed in the description. We'll also solve this problem in part 4.
- You don't need to change
setDescriptionto handle the case where it is called while the user is currently editing the card. (But you should consider using it to update the card description.)
Part 3: Moving cards
The final piece of functionality in this app is moving cards around on the board. Moving a card is a two-step process:
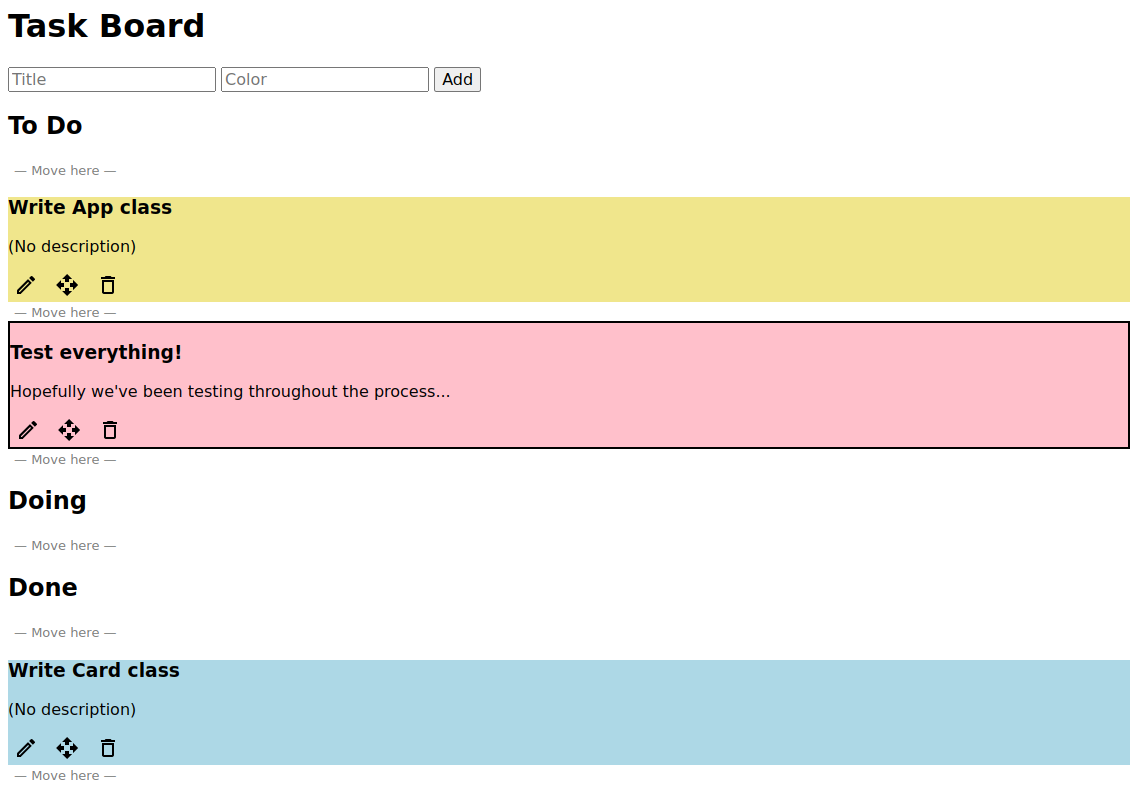
- When the user clicks on the move button of a card, the card is "selected for moving," and a number of "Move Here" buttons appear.
- When the user clicks on a "Move Here" button, the selected card is moved to the spot where the button is.
You'll implement a mover.js) to abstract away this logic. (You'll also need to modify App and Card in this part to integrate this.) Mover's public interface is as follows:
constructor(): Set up instance variables, handlers, etc.startMoving(card): Marks a card as selected and shows the "Move Here" buttons.cardis the card's element (i.e. the<article>element, not theCardinstance).stopMoving(): Called when another class wants to ensure no card is being moved, e.g. because a card is being added or deleted.
Your task is as follows:
- Initialization:
- Initialize a
Moverinstance inApp. Pass this instance toCardwhen adding it (via the previously-unusedmoverparameter inaddToCol).Cardshould store this for later use. - There should only be one
Moverinstance for the entire run time of the app--do not create a new one for each card.
- Initialize a
- Starting a move:
- When the user clicks a card's move button, give the card the (CSS)
class"moving". - Add a button after the
columnTitleand after each card in the board. (This means a column withNcards will haveN + 1move here buttons. - Each button should have the
moveHereclass, and its text is defined in the constant at the top ofmover.js.
- When the user clicks a card's move button, give the card the (CSS)
- Completing a move:
- When the user clicks on a move here button, move the selected card from its current position to where the clicked button is.
- The card stops being selected, and all move here buttons are removed.
- The card may end up in the same place it started if the move here button directly above or below it is clicked. That is expected (and should work without a special case).
- Canceling a move:
- In some cases, you will want to "cancel" any move that has been started but not completed. This means unselecting any card that has been selected for moving, and removing all of the move here buttons.
- Cancel any incomplete move in the following cases: (1) a card is added, (2) a card is deleted, (3) before another move is started.
Some tips and notes:
- There is no template element for the move here buttons, so you will have to create them directly in JavaScript. While any element can respond to a "click" event, you should make these actual buttons (for accessibility, keyboard navigation, etc.).
- When adding the move here buttons, be careful not to cause an infinite loop. For example, if you loop through the children of an element while adding children inside the loop, the loop will run forever and may even crash your browser. Use a selector (with
querySelectorAll) to ensure you only add one button per column title/card. - Since the move here buttons don't start out in the HTML itself, and the number of buttons varies, you will need to add event listeners to these buttons as you create them, not in the constructor. But you should still
bindyour handler in the constructor. - When completing a move, you will need to know which card was selected for moving. This can be accomplished either via an instance variable or by searching the DOM. Either approach is fine.
- You will also need to know which move here button was clicked, which is a perfect use case for
currentTarget. - The
movingCSS class won't have any visual effect right now. We will fix that in the next part. - An element can only exist in the tree once. If you use a DOM function to add it to the tree and it is already added somewhere else, it will be moved.
- The
afterfunction will be useful for this part. - It shouldn't be possible for your move here button handler to be called without a selected card, so you don't have to handle that case. But note that
stopMovingmay be called when no card is selected and no move here buttons exist (in which case it should do nothing).
Part 4: Styling cards (a bit
Your final task is to add a bit of CSS to the page. For the time being, we'll focus on a few very specific changes. In assignment 2.2, we will revisit this app, adding more CSS to tidy things up, adjust the spacing between elements, and handle the overall page layout.
styles.css (already linked in the HTML) starts with a few rules. Review them, then add rules to do the following:
- Fonts for interactors: Change the font size of all
<input>,<button>, and<textarea>elements so it is the same as normal text. Also change<textarea>s to use the same font family as the rest of the page (at least on some browsers/OSes, it defaults to a monospace font). - Card selected for moving: A card selected for moving should have a
2px solid blackborder. - Edit description text box: Make the text box for editing descriptions expand to the full width of the page, have a height of 5 times the font size, and have the same background color as the rest of the card.
- Whitespace in descriptions: Change the whitespace handling for the description so that newlines and multiple/leading spaces will show up. The text should still wrap if it is too long to fit on one line.
- Card buttons: The card buttons (edit, move, delete) should use the card's background color and have no border. When the user moves their mouse over the buttons, their cursor should change to a "pointer" hand, and the button's background should become translucent (use
rgba(0, 0, 0, 0.25)as the color). - Move here buttons: Similar to the card buttons, these should also have no background/border and use the pointer hand cursor. They should also use a
smallfont size. When not hovered, their text color should begray. When hovered, they get a#e0e0e0background and their text becomes its normal color (black). - Note that the background, border, and cursor don't apply to the "Add" button.
Here is an image of these styles:
Some notes and tips for this part:
- CSS properties that will be useful here:
cursor,white-space. - You can set any CSS property's value to
inherit. This has two purposes: (1) make the element inherit this value from its parent, even if that property wouldn't normally be inherited; (2) "undo" the value you set in a previous (i.e. less specific) selector. - While background color isn't inherited, elements without a set background color default to
transparent, which is why an ancestor's background color will show through. - Try to write selectors that capture the underlying goal of the rule. For example, if you changed the number/type of buttons on each card, you shouldn't have to change your CSS rules to apply to the new/changed buttons.
- Use the grouping combinator (
,) to avoid duplicating rules.
Submitting
When you are finished, please submit your assign2 folder (without node_modules of course!) to Paperless.