Assignment 1: JavaScript fundamentals
Written by Neel Kishnani, Jason Chuen, and MichaelDue Thu Apr 20 11:59pm PT
Submissions not accepted after Sat Apr 22 11:59pm PT.
Backstory: As you embark on your web development journey, you decide to set your sights on something we can all get behind: fixing Axess! And hey, those systems are probably so broken that we may as well start from scratch, right? But before you can take on course enrollments, you'll need a few building blocks first. Besides, as we come up on commencement, maybe you can build up your reputation as a reliable web developer by helping out with that.
This assignment will have you practice some fundamental JavaScript concepts and how to use them in the browser. You'll build a small app to simulate students declaring their major and graduating.
Learning goals
After completing this assignment, you will be able to
- Write functions and classes in JavaScript that manipulate various types and data structures,
- Create modules that import dependencies,
- Create a small HTML page with form elements, and
- Use JavaScript to respond to user events and read form controls.
Getting started
As with assignment 0, follow these steps to get started.
- Download the starter code and extract the .zip file's contents.
- Open your command line and navigate to the extracted
assign1directory. - Run
npm install. - Run
npm startto start the web server. - Open
localhost:1930in your web browser.
Deliverables: We've tried to use boxes like this one to highlight the specific tasks you will need to complete for the assignment. These boxes won't stand alone without the rest of the handout, but consider, for example, using them as a checklist to make sure you've done everything.
Part 1: Warmup exercises
The first part of the assignment consists of a few short warmup exercises, designed to give you practice with JavaScript data structures.
You will write your answers in warmups.js, which has already been included in index.html. We have provided a function testWarmups(), callable from the console, to check your answers.
Task 1a: Using the debugger
The first task will give you practice using the debugger.
- To begin, please make sure you replace the TODO in the
importline at the top ofwarmups.jswith your SUNetID (login name, not number). - The function
debugExercisecallscheckAnswer, passing it a "secret code." Your task is to determine the correct code to pass. But sincecheckAnsweris being imported fromdebugme.js, located outside of yourassign1folder, you won't be able to modify it (in order to, for example, add aconsole.log). - Use the debugger to look at the JavaScript code for
checkAnswer. Then, calldebugExercisefrom the console and stop the function while it is running so you can inspect the values of the relevant variables to determine what you must pass to it. - Once you have the secret code, replace the TODO in the argument to
checkAnswer. RerunningdebugExerciseshould print a "Success!" message. - Finally, fill in the comment in
debugExercisewith a brief (1-2 sentence) explanation of your strategy: how did you enter the debugger, and where did you stop? How did you read the secret code?
Some notes for this task:
- The list of files in the Sources tab is split up by where the files are located. You'll find
debugme.jsunderweb.stanford.edu. - The secret code is a short string of random characters, different for each student. The script that generates it uses some advanced JavaScript features, so we've tucked it away in another file. You may look at the file if you'd like, but it's not necessary (and probably won't help you get the answer).
- This being the web and JavaScript, there are ways to "circumvent the process" and solve the task without the debugger. We ask that you avoid these unintended alternate strategies, both because we think the debugger is a valuable tool to have in your toolbox, and because we expect that solving the task using the debugger will be much easier. If, after following the process we've outlined, you want to think about how you might solve it a different way, feel free.
Task 1b: Working with data structures
For the rest of this assignment, you'll work with data for a few sample students and departments.
First, open data.js to have a look at the provided data. The file exports a single JavaScript Object with three entries:
studentsis an Array of Objects, each object representing a student. A student object contains theirgivenName, theirsurname, and theirsunetid. (Note: These aren't the CAs' actual SUNetIDs.) You can assume that SUNetIDs will be unique across all students in the array.deptsis an Array of Objects. Each object contains information about a department: itsname(like "Computer Science") and itscode(like "CS").unitsis an Object mapping student SUNetIDs (keys) to the number of units that student has completed (values). You may assume that there will be one entry in the object for each student instudents.
This data object has been imported into warmups.js as the variable DATA. Once you have reviewed the data, fill in the functions in warmups.js, using DATA, as follows:
firstNSunetsreturns the SUNetIDs of the firstnstudents (nis a parameter to the function) in thestudentsarray. You can assume there are at leastnstudents.shortDeptCodesreturns an Object whose keys are department names and whose values are their corresponding codes. But only include a department in the result if its code is exactly two characters long.averageUnitsreturns the average number of units completed by all students in the data. You can assume there will be at least one student, and you don't need to round or truncate the result.
Each function should be relatively short and will involve some form of iteration. Once you have written these functions, you can use testWarmups (which is exposed to the console) to check that your answers match what we expect.
Note on style and style checking
To help identify some common style issues (and a few functionality issues too), we have includes a configuration file for ESLint.
If you are using VSCode and have installed the ESLint extension, these issues should be highlighted automatically as you code. (If you aren't seeing any highlights, you may have to restart VSCode after you do npm install.)
If you are using something else, or would like to check for lint errors manually, you can run npm run lint in your terminal (you'll have to do this in a different window than the one you ran npm start in).
Note that ESLint won't catch all (or indeed most) style issues. We will give you specific style feedback on your assignment through grading. But having a clean lint run is a good first step!
Part 2: Modeling students and departments
For the remainder of the assignment, you will work with the various other .js files in the public folder. All of these files are imported by index.js. We have included index.js in the provided HTML.
Your next task is to implement two JavaScript classes which we will use to model students and departments in our app.
Task 2a: Student class
Implement the Student class in student.js, and export it as the default (and only) export. An instance of Student will have the following properties (instance variables), which are all "public":
sunetid: The student's SUNetIDgivenName: The student's given namesurname: The student's surnamedept: The name of the department the student is declared in (a string), ornullif the student has not declared yetunitsCompleted: The number of units the student has completed (a number)isAlum:trueif the student has graduated,falseif not
An instance has the following methods (with corresponding signatures):
constructor(sunetid, givenName, surname): Construct a newStudent. The student's SUNetID, given name, and surname are as passed in. Students start undeclared, ungraduated, and with zero units completed.fullName(): Return the student's full name, which is their given name, followed by a space, followed by their surname.addUnits(units): Increase the number of units the student has completed by the parameterunits.toString(): Return a string representing the student, which should be their given name, a space, their surname, another space, and their SUNetID in parentheses. (For example, "Michael Chang (mchang91)")canGraduate(): Return a boolean indicating whether the student can graduate. A student can graduate if they have declared and have completed at least 180 units. If the student has already graduated, this method should throw anErrorwith a descriptive message.
Task 2b: Department class
Now write the Department class and export it as the default export in dept.js. An instance of Department has the following "public" properties:
name: The full name of the departmentcode: The department codestudents: An array of the current (non-alum) students who have declared under this department
Implement the following methods:
constructor(name, code): Construct a new department with the name and code passed in. Departments start with no current students.toString(): Return the string representation of the department, which is just the department's name.declare(student): Declare the passed-inStudentinstance under this department, updating the student's and department's instance variables accordingly. If the student is already declared under this department, this method should return without doing anything. But if the student is already declared under a different department, this method should throw anErrorwith a descriptive error message.graduate(): Check if each current student in the department can graduate; if they can, mark them as an alum and remove them from the list of current students. Return an array of the just-graduatedStudentinstances.
Some notes on these tasks:
- You may add additional instance variables and methods to these classes if you wish, but you are not required to.
- It is a good practice to reuse existing functionality where possible. For example, notice how a
Student'stoStringcontains their full name. - You may assume that a client of these classes will not modify the instance variables in a way that makes the instance inconsistent. For example, a client will not directly set a student's
deptwithout going throughdeclare. - You aren't required to do any error checking beyond what is described here.
- Review the end of lecture 3 for the syntax for throwing
Errors. Your errors should generate exceptions that can be caught and handled by the client of your class (which you will do in the next part).
Part 3: The App class
Finally, you'll put this app together by implementing the App class (in app.js).
Task 3a: Console interface
An instance of the App class is constructed by index.js when the page loads. App has the following instance variables:
students: An Object mapping students' SUNetIDs (keys) to correspondingStudentinstances.depts: An Object mapping department codes (keys) to correspondingDepartmentinstances.
The constructor has been started for you; you will add to it in the next task. First, implement the following methods:
loadData(data): Takes an object with the three keys from the sample data (students,depts, andunits; see task 1b) and populates the app's instance variables:- First, reset the
studentsanddeptsinstance variables to be empty. This allowsloadDatato "reset" the app. - Populate the
studentsmap with newStudentinstances, using thestudentsdata. - Update the number of units each student has completed via the
unitsdata. - Populate the
deptsmap with newDepartmentinstances, based on the passed-in data.
- First, reset the
declare(sunetid, deptCode): Takes a SUNetID and department code (both strings) and tries to declare that student under that department, then returns the (updated)Studentinstance. If the SUNetID or department code isn't known to the app, throw anErrorwith a descriptive message. (If callingdeclareon theDepartmentcauses an error, don't handle it here.)graduate(deptCode): Make the department specified by the passed-in code try to graduate its students, returning the list of graduates (Studentinstances). If the department code doesn't match a known department, throw anErrorwith a descriptive message.
You will also need to add imports for Student and Department.
Testing
After completing these methods, you will be able to test your app from end to end:
- The
appinstance is exposed to the console. You can inspect its instance variables and call its methods. - For example, you could call
app.declare(“mchang91", "CS")orapp.graduate(“BOGUS"). (Note thatloadDatais already called for you inindex.js.) - The function
testApp, exposed to the console, will attempt to test a variety of methods from part 2 and this task. If anything doesn't match, it will print out an error message. These tests aren't comprehensive, and we encourage you to add some more tests of your own.
Task 3b: User interaction on the page
Your final task of this assignment is to expose the declare and graduate methods you just wrote to a user of the web page:
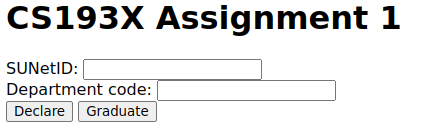
- Edit the HTML to add a form with two inputs, one for SUNetID and one for department code. These inputs should be labeled so they are identifiable, and make sure to give them
ids so you can reference them in JavaScript. - Add two buttons to the form, one for "Declare" and one for "Graduate".
- In
App, implement the functionality for these buttons: - When the user types in a SUNetID and department code and clicks "Declare", call your app's
declaremethod with the entered values. - If the declaration is successful, display an
alertinforming the user, including the student's name and the department name. For example, "Michael Chang (mchang91) declared Computer Science!" - If the declaration fails, display an
alertwith the error message. (Note: It's not enough for the error to be printed to the console, since users won't think to look there. You must catch the error and present it viaalert.) - Similarly, implement the "Graduate" button. This button ignores the entered SUNetID. Upon success, display an
alertlisting the students who graduated. For example,Graduates: Neel Kishnani (neelk) Jason Chuen (jahchuen)
(You can use\nto add a newline inalertmessages.)
Some notes on this task:
- You do not have to lay out the form controls in any particular way and are not expected to add any styling. As an example, here's how we laid them out:
- You will need to add additional methods to
Appand are free to add instance variables as well. But you should mark them as "private" by prefixing them with an underscore (_). - Recall from lecture 4 that you can access the forms on a web page using
document.forms, and you can reference the controls of a form using theiridor a property of the form. - Remember that a
<button>l;inside of a<form>defaults to havingtype="submit", meaning it will refresh the page when clicked. You'll want to change its type tobuttonto avoid this. - Don't forget to
bindyour event handlers! As seen in lecture 4, it is best practice to do this in the constructor (and this is preferred over creating functions on the fly.)
Submitting
When you are finished, please remember to delete your node_modules folder, and then submit your assign2 folder to Paperless.